

Face Mask Tutorial
Face masks, whether we like it or not, are now part of our future and, with this in mind, I began to research into them just prior to the first lock-down for COVID-19 when they were impossible to get hold of. After watching numerous video tutorials, trialing pattern shapes, tweaking samples and road testing a number of different designs I have come up with a version which I would like to share with you.
The two essential elements of a protective face mask are the fit and the filter. To assist with the fit I have inserted wire into an upper channel of the mask so that it can be molded to sit comfortably on the nose and make a seal to the cheek for a closer fit. It is important that the sides don't gape away from the face and the lower edge should tuck neatly under the chin so I have included darts at the upper and lower edges of the mask. Elastic loops are stitched into the side openings for a comfortable fit around the ears. I have also made the mask in two different sizes, the smaller one is suitable for children under 16 years.
My version is reversible so that you can change it to coordinate with your look, therefore maintaining your usual stylish appearance. It is made from two layers of closely woven 100% cotton fabric and there are openings either side for fitting a disposable filter. I've made my filters from Hepa-flo bags cut from the Henry vacuum cleaner as this is the favoured option recommended in my research.
Please understand that no face mask can guarantee the prevention of contracting any virus, however there is significant evidence to suggest that it is more beneficial to wear one than not when you are in public environments, especially indoors. For maximum effectiveness the mask should have a filter which can be removed (and disposed of) at the end of each day and the mask should also be machine washed after every wear.
TO MAKE YOUR OWN FACE MASK YOU WILL NEED:
A sewing machine
An iron
100% cotton close weave (2 x large) fabric scraps
Hepa-flo filters (hoover bags)
0.5 m width elastic x 30 cm
Craft or garden wire
Thread
Pattern paper
Pencil
Tape measure
Scissors
Pins

1. Using the template at the foot of these instructions make a pattern by marking out the measurements onto paper. Press your fabrics with an iron. Pin your pattern to your fabrics, ensuring that the sides are parallel to the selvedge. Cut out the identical front and back mask pieces carefully. Remove pins.


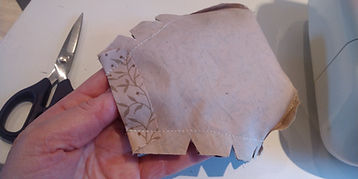
2. Fold each fabric piece with right sides together and stitch the upper and lower darts as shown above left using a 1 cm seam allowance.
3. Snip along the fold towards the stitch line so that you are able to open up the seam allowances and press them open with an iron.
4. Fold the short sides of the mask under (towards the wrong side of the fabric) by 2 cm and press.

5. Place both mask pieces together, right sides of the fabric facing each other, align the central seams and side (folded) edges.

6. Pin across the upper edge. Stitch a 1cm seam, reverse stitching at beginning and end. Repeat for lower edge. Sides remain open.

7. Snip into the seam allowance around the curve as shown below to ease the tension.
8. Turn the face mask through to the right side and press evenly (so that the front and back fabrics are not visible from the opposite side). Stitch a 1 cm wide channel across the upper edge .


9. Thread a 10cm length of wire through the channel. I'm using craft wire here but garden wire or even a paper clip are equally as good. Wiggle it carefully past the seam so that it lies across the centre of the mask.

10. Cut 2 x 15 cm lengths of elastic and tuck one end of each into the upper channel (open it with the point of your scissors and poke approximately 1cm through), pin into place. Similarly, insert the other end of the elastic just inside the lower edge of each of the side opening and pin in place. Stitch the elastics in securely either by hand or by machine. I like to machine-sew in the shape of a little box to doubly secure and reverse stitch too. Be careful to leave the sides open as you'll be inserting a filter through there.
11. To make a filter cut a pattern use the lower template (below), adjusting for the size of your mask. The Hepa-Flo filter is already 3 layers thick which means that your mask will be 5 layers thick in total. You can get approximately 10 filters from 1 bag.

12 Pin your pattern to the hoover bag (don't worry about lining up with a grain line, just fit as many in as you can) and cut out your filters. Insert them into the face mask by rolling the individual filters lengthwise then push them through one of the open sides, grab the end through the other side and wiggle to unfold it until it sits flat within the mask. It's a bit fiddly but it does work. Ta Da! You're welcome.


